About this deal
An Australian Visa or Mastercard debit/credit card; 2) To be over 18 years of age; 3) To live in Australia
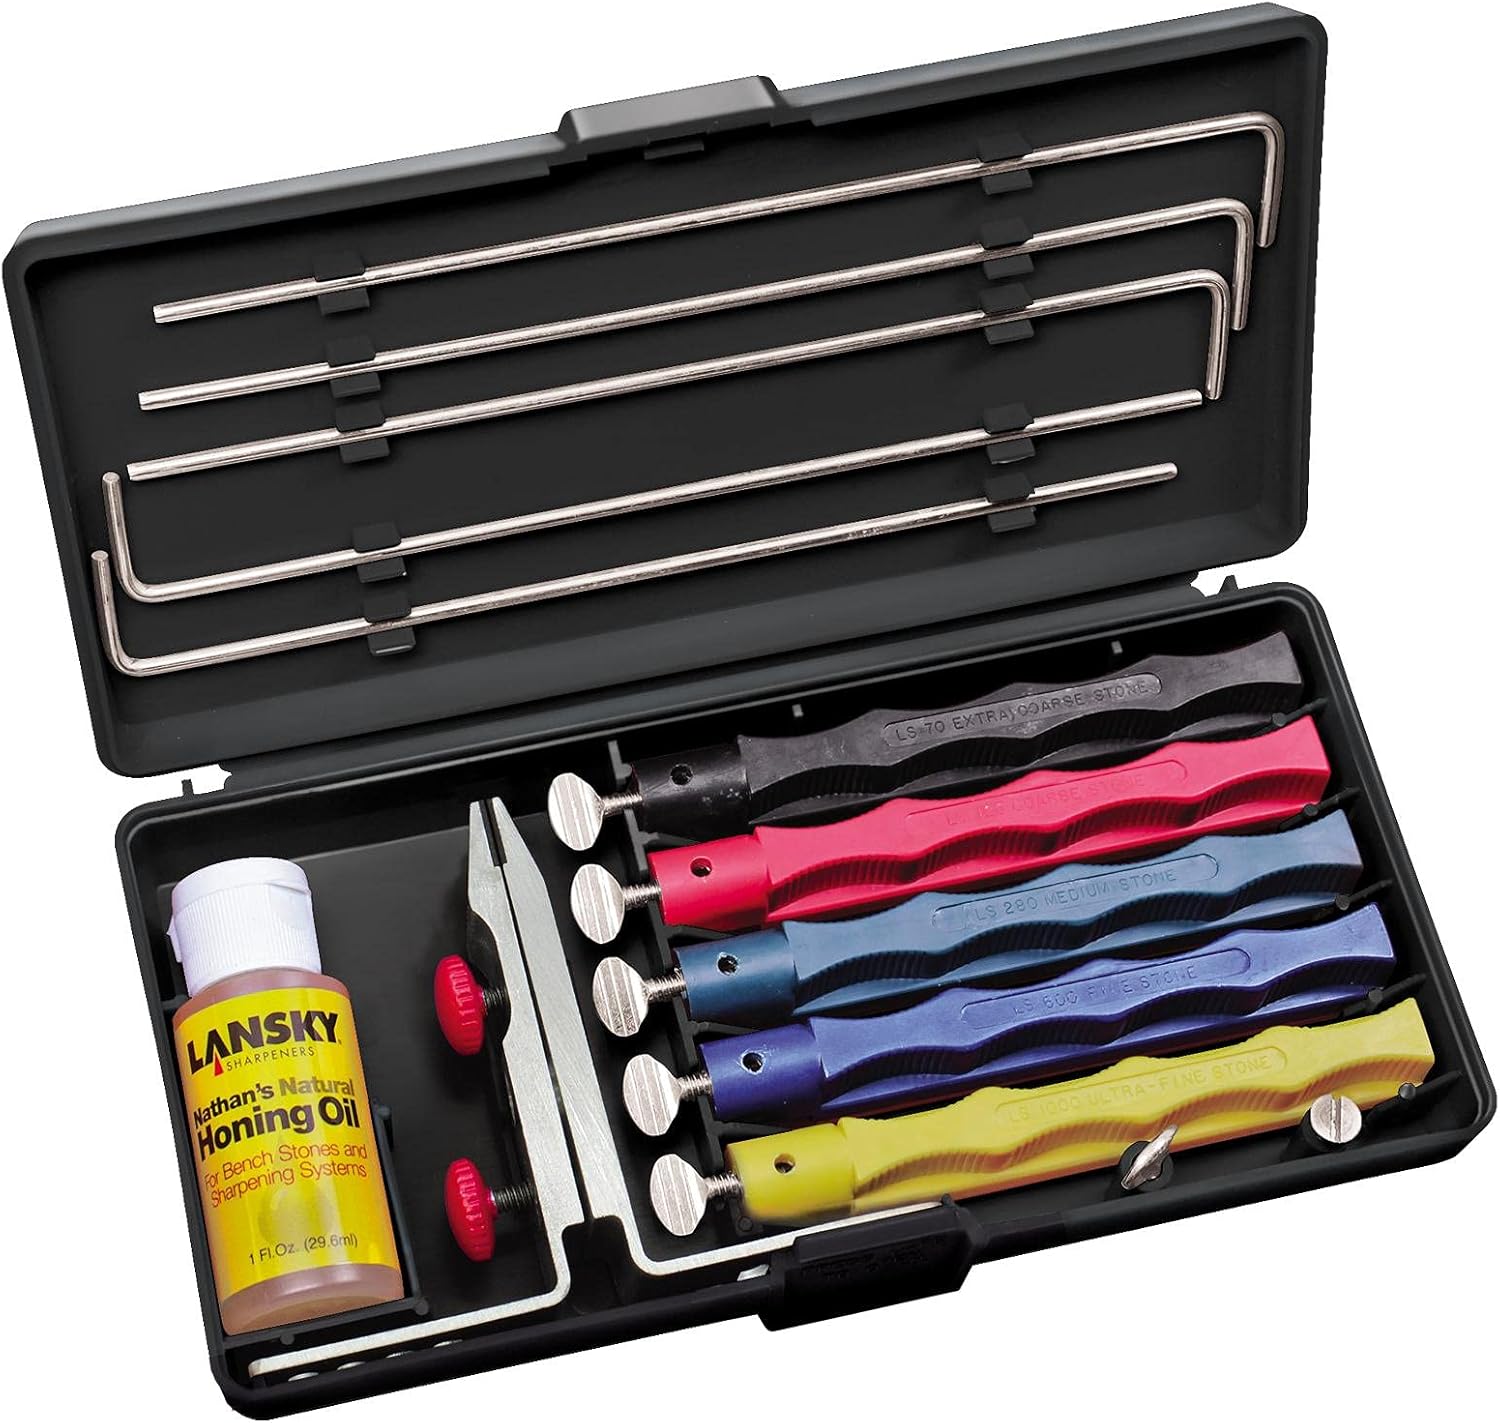
The “ Deluxe” kit features 5 standard type stones, but Lansky makes a number of other kits as well as sells individual stones for different needs – a leather stropping hone, diamond stones, curved stones for recurved blades, triangular stones for serrations, natural Arkansas stones, all in varying grits so you can tailor your setup to your needs and preferred technique. Construction We obtain the products we review through either buying them ourselves or working with companies to obtain review units.
Technique and Use
First and foremost, if you don’t set this system up right you will not get satisfactory results. Here’s why: it’s built around accurately putting a consistent angle on the edge of the knife, so anything you do that messes with that accuracy is going to have a bad end result. To start, you have to level the rods themselves and then level the rods with the stones before you tighten them down. Set the rods long side down on a table and make sure they aren’t bent or arced – a few of mine were. Straighten them out so they’re totally flat on the table – I used a rubber mallet with a few light taps. The Sharpmaker is what made Spydercoa household name in the cutlery industry. Not their knives, but this simple portable sharpener. Simple is the key word: it’s portable, easy to understand, and easy to master. Selecting the appropriate sharpening angle is key to achieving edge sharpness and edge retention for your specific knife. Now, you need to hold the clamp. Lansky says to hold the bottom of the clamp in one hand, edge of the blade facing away from you, and hold the handle with your other hand. I have an adjustable vise at work which I find vastly preferable, I drop one side into the vise with the blade facing me and tighten it down. Now you’re ready to start. This is the first electric sharpener on our list, and one of only two that I think are worth looking at for real knife enthusiasts. Many electric knife sharpeners are just sort of glorified pull-through sharpeners – they create a lopsided burr that will tear up a steak for a few cuts – but the Work Sharp is more akin to a powered Sharpmaker. It uses a 120V/1.5 Amp electric motor to drive a flexible belt in a triangle shape, and a guide fits over the belt. The angle of the guide is adjustable between 15 and 30 degrees per side (so 30-60 inclusive) and you place the blade in the guide, sharpening one side then flipping to the other, leaving a convex edge bevel (as opposed to most of the rod sharpeners which do flat edge bevels) which Work Sharp and Ken Onion claim is more durable than a flat edge.
Guided angle sharpeners in a lot of cases are glorified jigs, a device that you mount the knife in and can then apply an accurate angle on a stone to the edge bevel of the blade to create a consistent edge. Obviously there are many ways to skin a cat, and knife sharpeners vary wildly in construction, design and price. One commonality all sharpeners have – they start at a coarse (low grit) abrasive to remove metal the fastest and set the profile of the edge, and gradually progress to higher grit (fine) abrasives to refine that edge as accurately as possible, including leveling out the burr that develops when you sharpen one side at a time. You’ll need the Lansky Sharpening System, which typically includes a knife clamp, guide rods, sharpening stones (coarse to fine grit), honing oil, and a cleaning cloth. We ensure you will love both of them. But you don’t need to buy them together. You can choose anyone from the two Lansky sharpeners. Both of them have multiple Lansky sharpening angles . So, both products are suitable for sharpening versatile blades.
Its user-friendly design allows anyone to achieve desrired results, restoring a knife’s edge to optimal sharpness. The sharpener typically consists of a clamp to hold the knife securely in place. Along with a set of sharpening stones with varying levels of grit. Carefully handle the knife and perform a simple test by gently running the blade across a piece of paper or a ripe tomato.
The Lansky Knife Sharpener comes with guide rods that fit into holes on the knife clamp. Carefully insert these rods into the corresponding holes and make sure they are tightly secured. A properly sharpened knife should effortlessly cut through the material with little resistance, resulting in clean and smooth slices. These stones are essential for progressively honing the knife’s edge, starting from coarser grits to repair any significant dullness or damage, and moving towards finer grits for a polished, razor-sharp finish. Step-by-Step Guide: How to Use a Lansky Knife Sharpener Step 1: Gather Your MaterialsThe general concept is this: you have a set of stones (3 to 5 of them) of varying grits which you attach to rods. The rods pass through a number of marked slots on a two-sided clamp, which you clamp your knife into in a specific manner. The slot you pass the rod through sets the angle of the stone against the sharpened edge of the blade, creating an accurate edge as you progress up from low to high grit stones. Avoid this because all it’s doing is moving the steel filings to the underside of the blade. After a while, you’ll find that the blade isn’t getting sharp at all. When stroking up against the blade, sweep to the side as you do it to cover the entire blade. This will give you an even edge across the knife blade. How Many Times On Each Side? You can repeat this five to ten times on one side. After which you should flip the knife over and do the same on the other. Do this until the knife blade is sharp then switch to the medium hone. Repeat with less pressure this time, and then move to the fine hone. You might feel that the hone is losing some of its stability. This is because the hone is getting clogged with steel filings. Repeat this honing process several times on each side of the blade. Making sure to maintain the correct angle and apply gentle pressure. Mastering the Lansky is really all about technique and persistence; you’ve got to be consistent and patient when you’re setting the initial angle, once you get beyond that it’s pretty smooth sailing. Recommended Extras
 Great Deal